A puddle disappears before every wet floor layer has dried. In Paramus, where Van Saun County Park occupies the eastern side of the borough, a household floor loss still starts with the rooms and boards actually affected. The useful questions concern the water source, the direction of travel, the floor assembly and the material readings that will support a repair decision.
Key takeaways
- Preserve photographs of board edges and finish changes before furniture shifts.
- Trace moisture through doorways and beneath accessible floor edges.
- Let material readings and floor condition determine the drying approach.
- Delay sanding and finish decisions until the drying assessment is complete.
Locate the source and map the wet floor
Water from a kitchen or utility space can spread into an adjoining room before anyone notices it. The first assessment follows the release from its source across the floor, recording thresholds, rug locations and furniture that obstructed movement.
A small visible puddle can be the remaining edge of a wider earlier spread.
Source control comes before judging the floor's recovery. A leaking connection or appliance requires attention from the appropriate repair professional, and wet electrical equipment should remain undisturbed.
The inspection can then distinguish continuing entry from water already held in the floor and adjacent finishes.
A hardwood water damage inspection should identify the installed flooring and accessible layers beneath it. The assessment also notes how boards meet cabinets, walls and doorways, because those details affect where moisture checks and drying access can be made.
- Locate the original water source and record its repair status.
- Photograph floor transitions before rugs or furniture are moved.
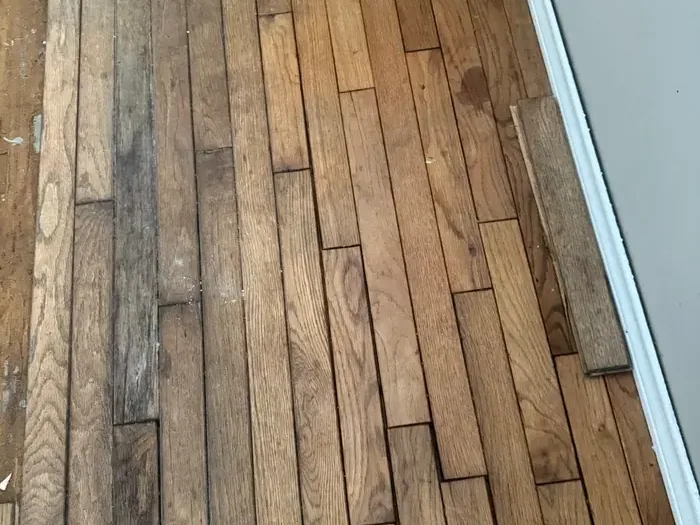
- Describe visible lifting, gaps or changes to the finish.
Record board movement without forcing the pieces flat
Raised edges, separated joints and altered finish appearance deserve close photographs. The camera should capture an overall room view as well as individual boards, with a recognizable feature connecting the close view to its location.
Repeating the same view later makes changes easier to compare.
Owners should keep people away from boards that have lifted enough to create a trip hazard. Heavy furniture should not be used to press a moving floor back into place.
A technician can evaluate whether the affected boards can remain during drying or whether controlled removal is needed for access or safety.
A floor's surface appearance is one part of that decision. The attachment method, accessible underside and condition of the supporting layer also matter.
Writing those observations down helps a flooring professional understand why a particular section was retained while another was opened.
- Keep the affected walking area protected from routine traffic.
- Leave unstable boards for professional assessment.
- Maintain matching photographs as the floor changes.
Look for the quiet route beneath kitchen fittings
Appliance water can reach spaces that remain hidden after a towel removes the visible spill. Cabinet bases, the floor behind a machine and the edge beside a fixed island deserve attention when they connect with the release.
The inspection should follow the physical route instead of stopping at the easiest surface to reach.
An appliance leak assessment coordinates inspection access with source repair. Moving a connected appliance may require a specialist, especially when electrical or supply connections are involved.
The owner can preserve the appliance details and repair paperwork while the cleanup team checks the wet construction around it.
Accessible cabinet interiors can help establish whether water traveled into neighboring storage. Items should be removed only through a safe route and kept apart from wet packaging or residue.
Where a cabinet conceals the floor boundary, the work plan should name the unresolved access point so it receives a follow up inspection.
- Include cabinet toe spaces beside the observed release.
- Identify connected appliances before anything is pulled forward.
- Keep repair findings with the affected floor diagram.
Measure comparable materials in repeatable places
A useful floor record connects each reading to a room, board area and measurement method. Technicians select suitable dry comparisons and revisit marked locations rather than collecting unrelated readings around the room.
That approach helps reveal whether moisture is declining evenly or remaining concentrated at a particular edge.
The underlying material may need its own access and measurements. A finish layer can appear improved while a concealed layer remains wet, so the assembly should be evaluated as connected parts.
Inspection findings determine whether a removable edge, an existing opening or another controlled access point is appropriate.
The owner can support monitoring by leaving labels and agreed equipment positions intact. Moving a drying device or covering a test area with a rug changes the conditions being evaluated.
Changes required for safe household movement should be discussed with the team and entered in the work record.
Use the drying plan to protect adjacent finishes
Drying a wood floor requires attention to more than the center of the room. Base trim, nearby wall material and connected thresholds may have shared the same exposure.
Their condition helps determine the equipment layout and whether any enclosed section needs access to release trapped moisture.
During structural drying, air movement and moisture removal are adjusted to the affected assembly. The monitoring record should show the floor response alongside relevant room conditions.
A slow section can then receive focused inspection rather than allowing the whole room to continue without a clear reason.
Equipment creates practical restrictions in an occupied home. The household should have a safe route past the working area, and cords should remain protected from traffic.
Doors, windows and room access should follow the drying plan so daily routines do not repeatedly alter the conditions the technician is measuring.
- Keep equipment controls in the agreed operating position.
- Report new lifting or movement at a doorway.
- Arrange household access around the protected floor area.
Separate a dry floor decision from a finish decision
Removing moisture and restoring appearance are related but separate tasks. Once drying has been evaluated, the flooring professional can assess remaining movement, damage and finish condition.
Sanding or coating too early can commit the repair to a surface that is still changing.
An owner considering replacement should ask which layer is damaged and why it requires removal. A clear explanation links the proposed work to the condition of specific boards or supporting material.
It also identifies whether adjacent trim, cabinets or transitions must be addressed as part of the same repair.
The repair scope should describe the intended retained areas as carefully as the replacement areas. Photographs and final readings help the flooring trade plan its work around what remains.
Decisions about appearance, matching and finish selection can then follow an established material assessment.
Hand the next trade a floor map rather than a pile of photos
A room sketch with labeled views is easier to use than an unorganized camera roll. The handoff should show the source location, the wet boundary, opened areas and any materials removed.
An index of reading locations lets the repair team connect the drying record with the floor standing in front of it.
The household should also retain appliance or plumbing repair details and note any continuing restrictions. If a transition remains unfinished or a cabinet base is still open, those tasks belong on the repair list.
A clear handoff prevents a cosmetic repair from overlooking the location that originally held the moisture.
Questions
Does a normal looking finish mean the floor is dry?
A surface can look unchanged while moisture remains at board edges or below the finish layer. Technicians use the installed assembly, comparison areas and repeated readings to evaluate recovery. Appearance remains useful evidence, but it needs to be considered with the material assessment.
Can a rug go back as soon as the puddle is gone?
The affected area should stay available for inspection and drying until the team releases it. A covering can conceal a change and interfere with the planned airflow. The owner can ask for a specific date for the next assessment rather than covering a section between visits.
Will every raised board need replacement?
The repair decision depends on the board condition, attachment and response during drying. Some areas need removal for access or lasting damage, while other areas can be assessed after drying. The flooring specialist should explain the finding for the section under consideration.
What should be saved from a leaking appliance repair?
The owner can keep the service invoice, the diagnosis and photographs of the failed connection or component when available. Those details help connect source correction with the floor exposure and support a coordinated handoff to the restoration and flooring trades.