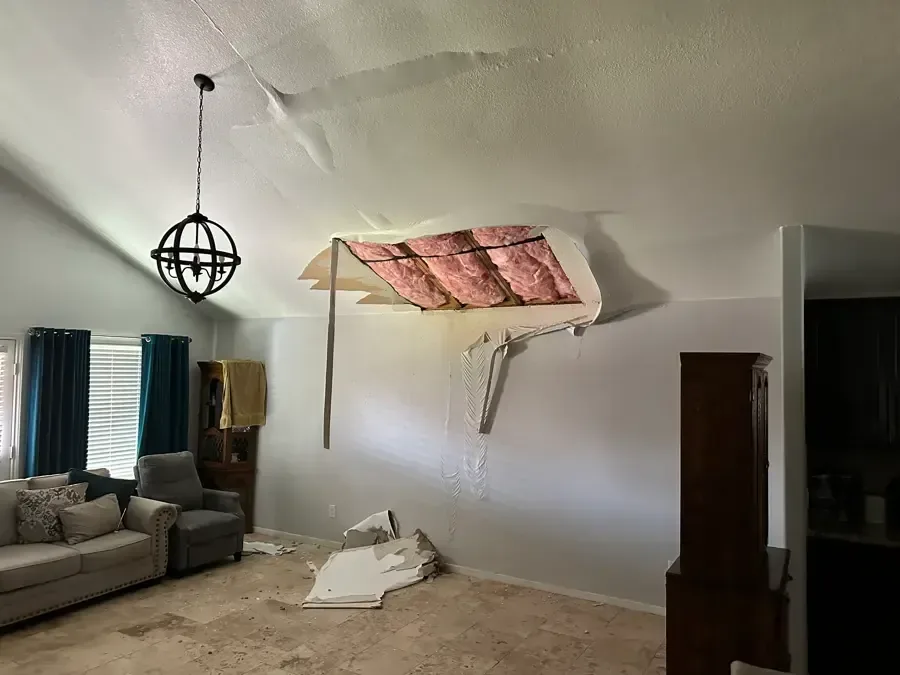
Ceiling Leak Water Damage in Paramus, NJ
The restoration crew checks the wet ceiling, the cavity above and nearby wall paths after source control. Stable access, electrical clearance and measured drying come before patching a stain or replacing paint.
(888) 471-9821Inspect overhead moistureHow ceiling leak water damage is handled in Paramus
Ceiling leak cleanup in Paramus follows the water above the visible mark. The team evaluates sagging finishes, soaked insulation and wet framing, then coordinates controlled access with the source repair and electrical assessment.
First steps for ceiling leak water damage
- 1
Clear the area below
People and pets stay outside the space beneath sagging drywall, loose plaster or wet light fittings. The crew assesses stability before approaching the damaged finish.
- 2
Pause the suspected fixture
If dripping follows bathroom or appliance use, occupants stop that use and notify the property manager where applicable. The repair specialist tests the suspected source.
- 3
Keep electrical controls untouched
Wet lighting and outlets require qualified assessment. Switching a wet fixture repeatedly or reaching through the ceiling opening can add an electrical hazard to the water loss.
- 4
Preserve the stain record
Safe photographs show the original ceiling mark and nearby wall damage. The technician uses those observations with meter readings to plan access and document the scope.
What does ceiling leak water damage cost in Paramus, NJ?
Ceiling leak mitigation often costs $900 to $5,500 or more. Stability, cavity access, insulation removal and wet framing affect the drying scope. Source repairs and the finished ceiling replacement are priced separately from mitigation.
Small stable section
- Moisture inspection
- Limited drying access
- Adjacent wall checks
Open wet cavity
- Controlled finish removal
- Insulation assessment
- Framing moisture logs
Broad overhead loss
- Several ceiling sections
- Wet walls and contents
- Multiple drying positions
Compare the scope with the water damage cost calculator. The restoration company prices the inspected damage, material access and equipment needs separately from source repairs, replacement finishes and contents work.
The ceiling leak water damage process
- 1
Inspect the overhead assembly
The technician reviews the drip history, source status and stability of the ceiling. Moisture mapping covers the cavity and nearby wall paths. Electrical clearance and room protection determine the safe sequence for access.
- 2
Remove unstable wet finishes
The crew contains the work area and opens sections that cannot safely remain. Wet insulation and damaged material are documented before disposal. The opening provides access to hidden framing and reveals the full moisture path.
- 3
Dry the ceiling structure
The drying team places airflow and dehumidification to reach exposed joists and wall tops. Readings at repeatable points show progress. Equipment placement changes when a corner or framing connection remains wetter than surrounding material.
- 4
Prepare the repair handoff
The final review confirms source control and records the remaining moisture condition. The repair scope then addresses replacement insulation, ceiling finish and decoration. Photographs and daily readings explain why each section required access.
A ceiling stain can sit away from the actual leak because water runs along framing before dripping through a joint. The inspector traces that route before defining the removal area. Homes near Van Saun County Park, rooms off East Ridgewood Avenue and commercial space along Route 4 all require a look above the finish rather than a paint-only repair.
The ceiling surface hides the route
A plumbing leak upstairs may wet insulation, joists and the top face of drywall while leaving only a narrow mark below. Thermal imaging helps identify a temperature pattern, and moisture meters verify the actual wet materials. The technician checks nearby wall corners where water can turn downward.
The source repair may involve a bathroom fixture, appliance connection or supply pipe. Rain-related entry belongs in a roof and envelope investigation. Timing helps the specialist choose the inspection route but does not replace testing.
- Record whether the drip follows fixture use.
- Inspect the cavity beyond the stained edge.
- Check light fittings before work starts.
- Map wall corners below the wet ceiling.
Controlled access protects the room below
Heavy wet drywall and plaster can detach. The crew establishes a safe work area and removes unstable sections under controlled conditions. Soaked insulation comes out where it prevents access or drying. Contents below the work area need protection or relocation before removal begins.
The Ready.gov home emergency planning page supports preparation for temporary room restrictions. The EPA indoor air quality information explains the importance of controlling indoor moisture. The repair sequence addresses the wet assembly before decorative finishes return.
A dry cavity before a new ceiling
Airflow into the opened assembly and dehumidification in the room work together. The team measures joists and wall tops rather than relying on the newly exposed surface appearance. Dense framing can stay wet after the thin finish has already been removed.
The claim file includes the original stain, source observations, access opening and drying progress. It also distinguishes ceiling removal from the later replacement, taping and painting scope. A follow-up check confirms that the repaired source remains inactive before the ceiling is closed again.
- Save pre-opening photographs.
- Record the electrical clearance status.
- Monitor framing and insulation contact points.
- Close only after source and moisture checks.
Stay away from a bulging ceiling
Occupants leave the space beneath a sagging or water-filled ceiling. Puncturing a bulge can release a heavy load, and hidden wiring may be wet. The response team plans access from a stable area after the relevant electrical assessment. A bucket beneath a drip protects only a small surface; it does not support the ceiling or remove water in the cavity. The household can stop an upstairs fixture from a safe location while qualified help investigates. The crew protects the room below, documents the wet materials and uses controlled removal so the inspection does not create an uncontrolled collapse.
Ceiling leak water damage coverage
The restoration team covers homes and businesses across the borough, including the Route 4 and Route 17 corridors, with service in ZIP codes 07652 and 07653.
Ceiling Leak Water Damage questions
Can a stain be painted after the drip stops?
A stopped drip leaves the cavity moisture to be checked. The technician checks drywall, insulation and framing before a decorative repair. Painting too early can hide ongoing moisture and require the finish to be opened again.
Should a sagging ceiling be punctured?
Occupants should stay clear of the loaded area. Water weight, loose material and hidden electrical components require a controlled access plan. The crew assesses stability and protects the room below before opening the affected section.
Does thermal imaging prove a ceiling is wet?
Thermal imaging shows temperature differences that help direct the inspection. Moisture meters and material access confirm wetness. The team combines those observations rather than treating a camera image as a complete diagnosis of the leak.
Why check the wall beside the stain?
Water can follow framing and turn downward at a wall connection. The wall may absorb moisture before a visible mark forms. Checking those junctions helps define the drying area and avoids closing a wet corner.
Can the room remain occupied during cleanup?
The work area may need restriction because of overhead instability, electrical conditions, equipment or open cavities. The restoration team defines a safe boundary around the affected space while the source repair and drying continue.
What happens if the stain returns?
The repair specialist rechecks the source, and the restoration technician compares fresh readings with the earlier map. A returning stain can indicate renewed entry or remaining moisture. Active ceiling losses receive 24/7 response requests.
A wet ceiling needs safe access first
The 24/7 response addresses unstable finishes, source coordination and drying above the visible stain.